The Sodium Vapor light system for matting and compositing

Very interesting technique here for using sodium vapor lights instead of a green screen background because the lights are such a narrow bandwidth of light. It’s actually exactly 589nm. Wild stuff.

Top comment is interesting:

“I was one of the last people at Disney to use the Sodium Vapor light system. It was on "Something Wicked This Way Comes" in 1982 or 3. I was an vfx AC at the studio. The prisim was held under license from Rank. It was a hallowed object. It was kept in a steel box and it was studio policy that 2 AC's had to be with it at all times when it was removed from the storage locker. We both carried it to the stage, then carefully inserted it into the 2-strip camera. It was never left alone on stage, we took turns leaving for lunch, the john, etc. It hadn't been used for years but we had a series of tough matte jobs to shoot so they dusted off the old gear. I was aware I was watching a bit of history. The key was the didymium filter in the prism. That thing has to be around somewhere. Technically, Rank would still own it.“

Compers - what are your favorite special sauce tricks for distressing CG?

Interesting reddit thread here about distressing CG to match plates that has some good tid bits. Here are my take aways.

——-

If the plate has it, a little bit of blur on the highlights in the blue channel, added on top for those bright pings. Always adds a little something and it's not quite the same as chromabb.

——-

Was once compositing a shot with a mix of cg and green screen elements. Couldn’t get it looking meshed. Rendered the cg stuff with a green spill, layered it on a green screen, pulled a key and despill. Boom, finaled.

——-

I sometimes use a Luma key in ae to add heavier noise in the blacks to make it seem like my cg camera sensor is bad in low light.

——-

Filtering! (notch is my personal go-to. Scale up, scale back down). Then soften-sharpen. Throw on some chroma ab, looks real. If you have a beauty rebuild, divide out the albedo, blur and average with itself, the multiply back with your light pass. Gives you a nice color-bleed between different textures.

——-

The last one is a trick i have been doing for years. I also use it when doing product swaps. Basically, once you have the comped product in the frame, make it a smart object, blur it and then sharpen it to match. Really does wonders. Also, duplicate the comped asset and set that layer to softlight and blur it. That can help ”sit” the comped product into the shot. Remove all grain then add grain over everything is good one I use all the time. So much easier with AI denoising as well. I could probably write for days about all these damn tricks I have picked up over the years… lol!

Quit Taking It Personally

Here is some pretty good advice from Adam Savage when do you creative work for a job / living. I’ve been in these situations in visual art, commercial art and music. It’s all pretty relatable and good advice for the new comers out there.

Here's how to permanently wipe OneDrive folders from your PC if they keep recreating themselves

I don’t even know where to start on what a pain this damn windows box has been all week. Anyways, if one drive became sentient and installed itself and then WILL NOT remove the folders from you computer, I found a solution. This is a very big problem when you have to edit packages and environment variables for Houdini and other applications. Anyways, here’s the Fix.


. Press the Windows key and type "Regedit" to search for the Registry Editor. Click it to open it up.

2. Copy/paste this string into the address bar at the top and hit enter: 

Computer\HKEY_CURRENT_USER\Software\Microsoft\Windows\CurrentVersion\Explorer\User Shell Folders

3. The fix is simple. Right-click on each entry in the Name column that has “OneDrive” and hit Modify. Delete "OneDrive\" from the address string and hit OK. Do this for any and all entries where OneDrive shows up. 


Wes Fenlon, you are a true god among us. This has been messing with so much crap on this system and nothing else would remove that damn folder….

Make Your Renders Unnecessarily Complicated

This is some funny stuff if you know anything about CG or render engines.

I did a lens in Octane once following a tut and it was an interesting experiment. This person goes way next level though.

The results are pretty interesting as well.

Common Windows Maintenance

Here are some simple tasks to run to help maintain your windows machine and keep it virus free. I do this about once or twice a week. Does not take long at all with modern SSD drives.

Simple Windows Maintenance with Power Shell.

In the search bar, type, “powershell” and right click on that and pick, “Run as Administrator”.

Then type or copy and paste this:

DISM.exe /Online /Cleanup-image /Restorehealth

Let that run, then enter this:

sfc /scannow

Run that till there are no errors reported and then reboot.

Windows Offline Scan

K, I was just describing this to someone and did not realize how deep in menus this setting was, good lord. Anyways, here we go. Follow this freaking click path.

Start menu > Settings > Update and Security > Windows Security > Virus and Threat Protection > Scan Options > Microsoft Defender Offline Scan.

Run that and your computer will reboot into scary mode and hopefully remove any deep buried malware on your system.

So there are three simple steps for a clean running windows system as of January 2023!

Freetone!

With all the crap going on between Pantone and Adobe I kinda knew it only be a mtter of time till someone comes up with a solution. Check out Freetone. Cool stuff.

FREETONE by Stuart Semple contains 1280 colours including digital versions of his Pinkest Pink, Incredibly Kelinish Blue, Black 3.0 and TIFF.

A SIMPLE & TOTALLY FREE COLOUR PALETTE PLUGIN FOR ADOBE

That unlocks a whole books worth of very Pantone-ish colours.

1280 Liberated colours are extremely Pantoneish and reminiscent of those found in the most iconic colour book of all time. In fact it's been argued that they are indistinguishable from those behind the Adobe paywall. “

Redshift render, "No Devices Available" error.

Congratulations, you are dumb like me and upgraded your graphics card driver. Go team! There is no roll back function in the Device Manager anymore and Geforce Experience does not have that function either. But here is a handy link to the Nvidia Old Drivers search page.

Fun way to start the day troubleshooting… yeesh.

Recreating The Lord Of The Rings Doors of Durin in Unreal Engine 5

As you probably know, I have been learning more in Unreal 5 and find it pretty amazing. This article goes into to some interesting lighting techniques I wanna make a note of.

“For this project, I used Lumen for GI, screen space reflections (Lumen reflections didn’t support translucent materials in early access 2), and Virtual Shadow Maps to be able to get nice soft shadows in the Nanite meshes and also increase the shadow resolution overall. For the post process, I kept the exposure locked at 1 for minimum/maximum brightness. I also used a LUT with a subtle color correction that I did in Photoshop.

I added a lighting function in the directional light to create pockets of lights and shadow that gave a more interesting look to the scene: as if the clouds were moving and creating those light openings. To achieve this, I used a material with panning noise for the light function. Since this was a small scene with not so many elements, I wanted to introduce as much dynamism as possible to give some life to it, so the moving clouds, the wind in the trees, the moving particles used for the fog, etc., really helped the scene come together. 

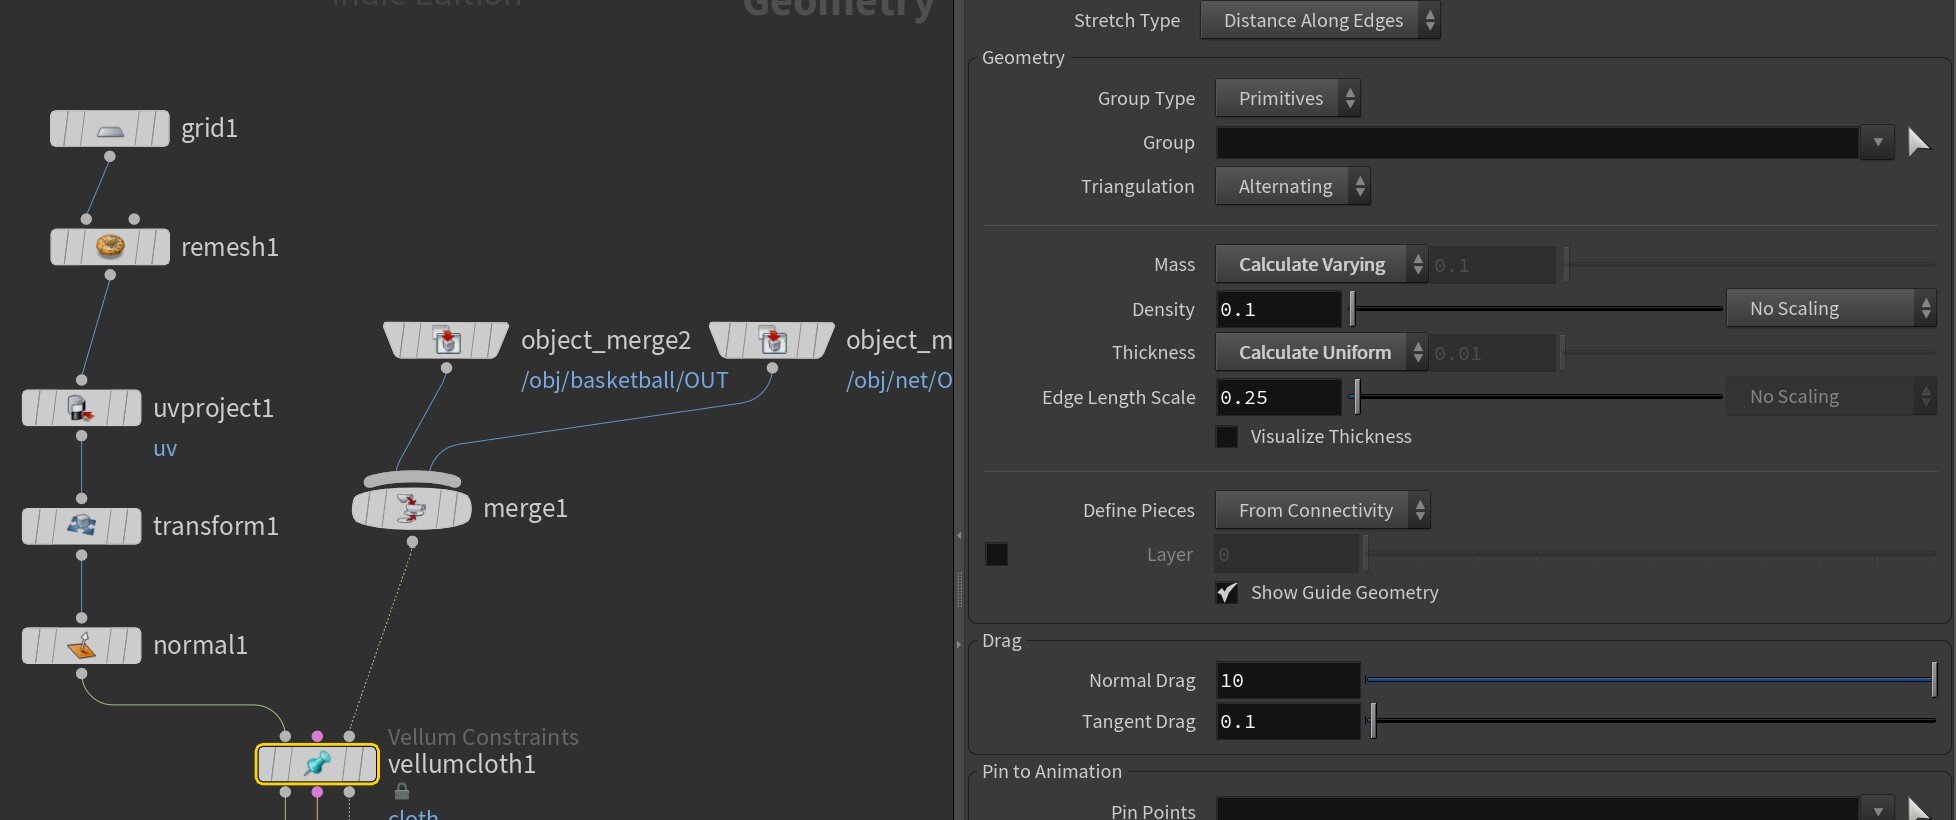
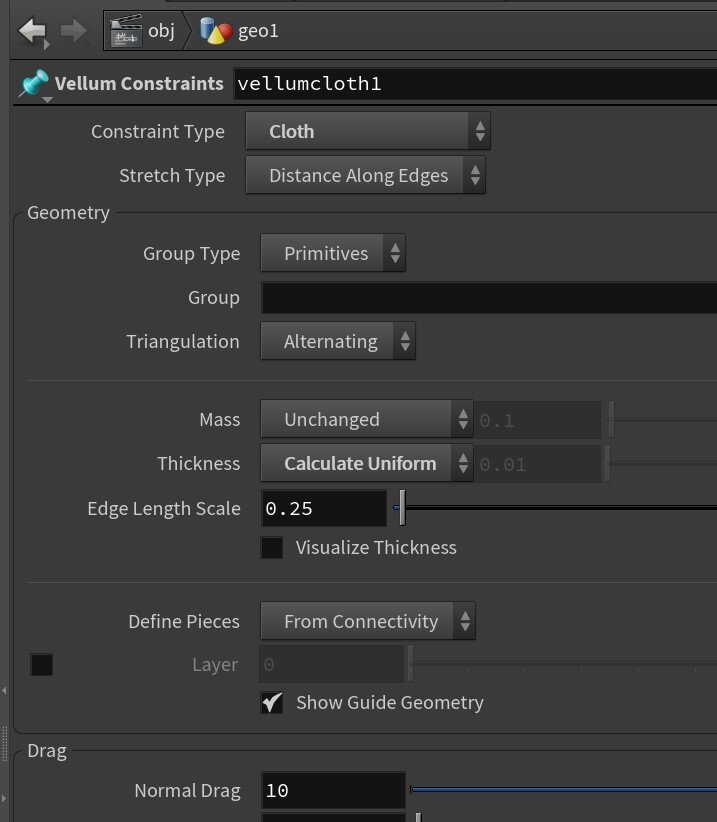
Houdini Vellum, random pins in simulation

Ran into a little bug messing around with vellum where it looks like pins are set to the cloth even though I have no pins set.

The way to fix is to go into vellum node and change “Mass: Calculate Varying” to “Mass: Unchanged”. That will unstick them.

Noedle - free texture maps!

Slack is talking about his new site for free texture maps, Noedle but the copy is where it’s at!.

“I always said the Earth was flat. How else could I have this beautiful Landscapes? Color, Normal and Displacement Texture to use on a flat surface.”

Learning Caravaggio Lighting Techniques

This is pretty cool to watch. A CG artist and a Director of Photography do a zoom call and go through lighting a scene in Caravaggio’s style. It’s in C4d and Corona, but it translates to pretty much anything. It’s interesting how the DP calls out real world lights and flags and where to put them. It’s not anything crazy new, but the discussion and the iterations they have going on is what I found the most interesting.

They do a series on them as well. Rembrandt and Hopper so far.

Hot Keys, Notes and More! Oh My!

Crazy resource here for all sorts of hotkeys, tips, tips for Houdini, Capture One, Photoshop and more. Easily searchable and pretty awesome for my day to day work. Hopefully, you find it useful as well.

“Over the years, I accumulated a lot of notes in text files. This page parses the TXT files and serves them as HTML. Browser search rocks!!” - Kristian Jungk

Here is one for Redshift in Houdini:

    display redshift material preview in viewport
        add RS Material builder 
            inside add a RS Material and TextureSampler
            connect them to surface
       
        right click on Vopnet -> Parameters and Channels -> Edit...
            add folder
                name it "See Tex"

            add toggle
                name it "Use diffuse"
                click Build-in Tags
                find Use Diffuse Map #

            add file image
                name it "diffuse map"
                click Build-in Tags
                find Texture #

PureRef. The program you didn't know you needed.

Just a little shout out to this super cool little program called PureRef. It’s just a simple image viewer that lets you get all your reference images in one clean window. You can scale move and shuffle them around however you like. Just a great little thing to have open when working. Here is one that I used for Fall Colors and Simple Sets.

Photo Bashing Ideas

Found a pretty awesome breakdown on doing some photobashing that is really well thought out. Not just the technique, but the ideas behind why to use the technique. Interesting little vid that has me thinking about the full class to be honest.

Houdini hair / fur with Redshift Render Engine

So I spent an insane amount of time last week trying to get hair / fur in Houdini to show up when using Redshift render engine. I was looking at all sorts of tutorials and not one of them mentioned this freaking setting to make it work. You have to toggle the Hair Generation from “Generate Geo in Mantra” to “Use SOP Geo”. BAM, everything works. Took me forever to find it. Hopefully, this saves you the same headache.

Photoshop 21.2.1 not recognizing Pen Pressure in Windows 10

So yeah, Adobe’s newest update to Photoshop fixes the pen pressure bug that made you have to include that PSUserConfig.txt file in your Photoshop Settings and turning off Windows Ink in Wacom Prefs.

So with this update you need to DELETE that file from

C:\Users\(your pc name)\AppData\Roaming\Adobe\Adobe Photoshop 2020\Adobe Photoshop 2020 Settings

Then turn Windows Ink ON in your Wacom Prefs.

Some Houdini OBJ stuff

Had a chance to start that RedShift Lesson from LFO Design last night and I am super happy with that purchase already. Lots of good general tidbits in there. In the meantime, the MoGraph Slack has been posting a bunch of great ways to bring in OBJs into Houdini I can’t wait to test out. Here is a free method for simpler models:

And here is a method that will do more complex models and match all the materials but it’s a shelf tool you have to buy. But at $50 it’s kinda a no brainer. OD Shelf Tools.

Can’t wait to dig into both of these at some point. But for now it’s all about RedShift, Redshift and a touch of Redshift…. maybe?